Introduction
In this lesson, I will demonstrate JWT Authentication with an example code. This blog post will also go through some of the principles that are essential to construct a JWT Authentication App in Golang. Before we get started, the first thing I’ll discuss is the prerequisites section, which you should be familiar with.
Prerequisites
You should be familiar with the following ideas in order to comprehend the tutorial and get the most out of it. The first step is to learn how to set up a workspace for your project. You should also understand the commands and procedures for importing mod files and any external packages. as well as notions such as Struct, Routing, and API. Here you need to be prepared with some downloads as well. The first thing that you need to download is Golang from the official website. The very next thing that you need to download and be prepared with is the IDE. For my project, I am using Visual Studio Code Editor as the IDE. It is very popular among developers and widely used. Then, to test your Golang Application, you need to have a postman application. Therefore you need to download that as well.
JWT & GIN Web Framework
Let’s begin with an explanation of JWT Authentication. JWT is an acronym for JSON web token, a stateless token-based authentication technique. It is commonly used as a client-side stateless session, allowing the server to save session data without completely relying on a database. JWT is widely used in server-to-server authorization and API authentication. Now let us understand Gin Web Framework. The client sends an HTTP request to a web application, and the server responds by delivering the desired information. Any answer format is possible, including XML, JSON, HTML, and others. In our Golang code, we employ the “net/http” package to assist the request and response process, which is a critical component of system maintenance. The net/http package has a disadvantage in that it is not particularly useful for sophisticated applications. This is where Gin Web Framework excels since it is quite beneficial for complex programming.
Starting with the Program
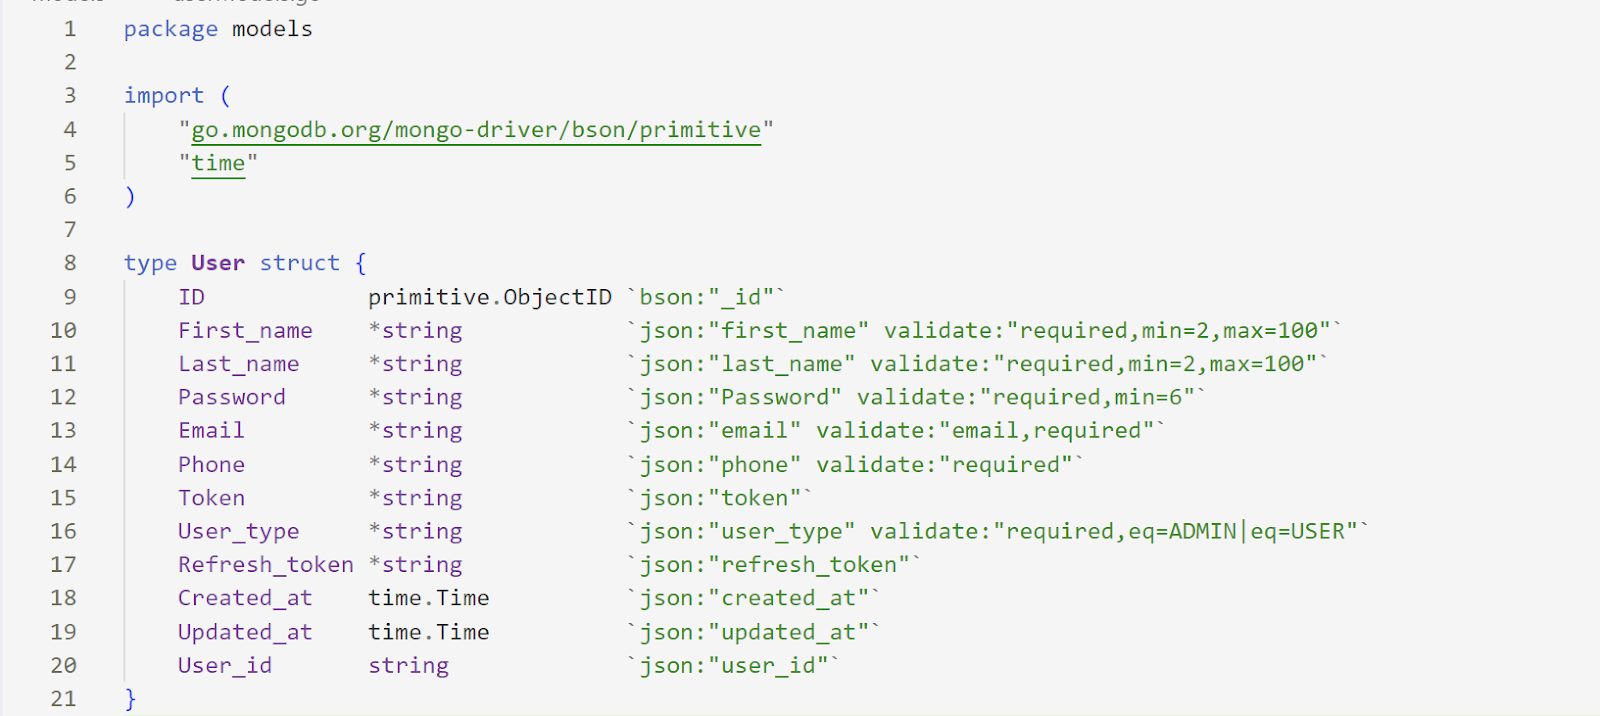
First lets, begin by creating the struct. In my struct, I have included ID, First Name, Last Name, Password, E-Mail, Phone Number, Token ID, User Type, Refresh Token ID, Created at, Updated at, and User ID are all fields in my struct. Here, I used “validate,” which verifies if the client-side data is in the format we’ve planned for and produces an error if it isn’t. I specified eq=ADMIN|eq=USER in the User input element since it verifies the value of the field type of user to be either ADMIN or USER. (Refer to Image 1)
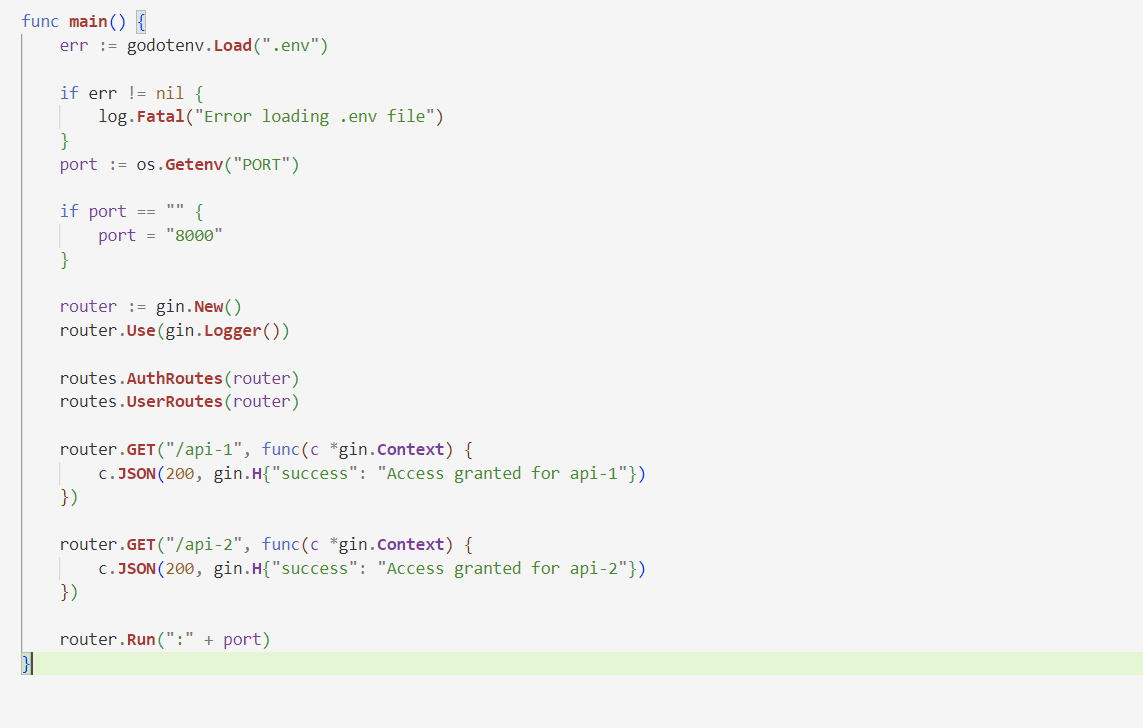
Moving ahead, I will now work on the main.go file that basically contains the main function that includes certain internal packages such as “log” and “os”. Furthermore, several external packages must be imported, such as “github.com/gin-gonic/gin” (Gin), “github.com/golangcompany/JWT-Authentication/routes” (routes), and “github.com/joho/godotenv. In the main function “routes.AuthRoutes(router)” and “routes.UserRoutes(router)” invoke the package routes’ methods AuthRoutes and UserRoutes. The method accepts an argument of type *gin.Engine, which is a reference to the package gin’s Engine struct. Then we define a basic API that provides JSON data and has two endpoints: /api-1, and /api-2 (Refer to Image 2)
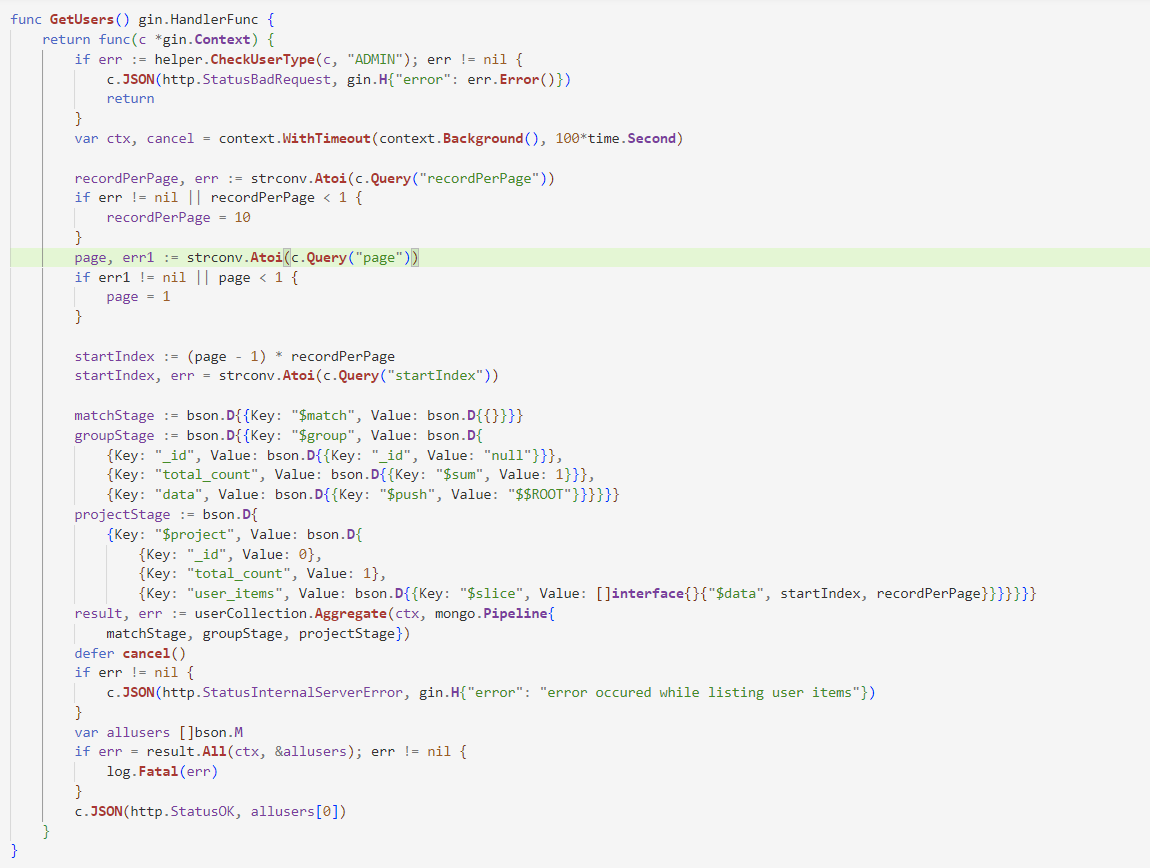
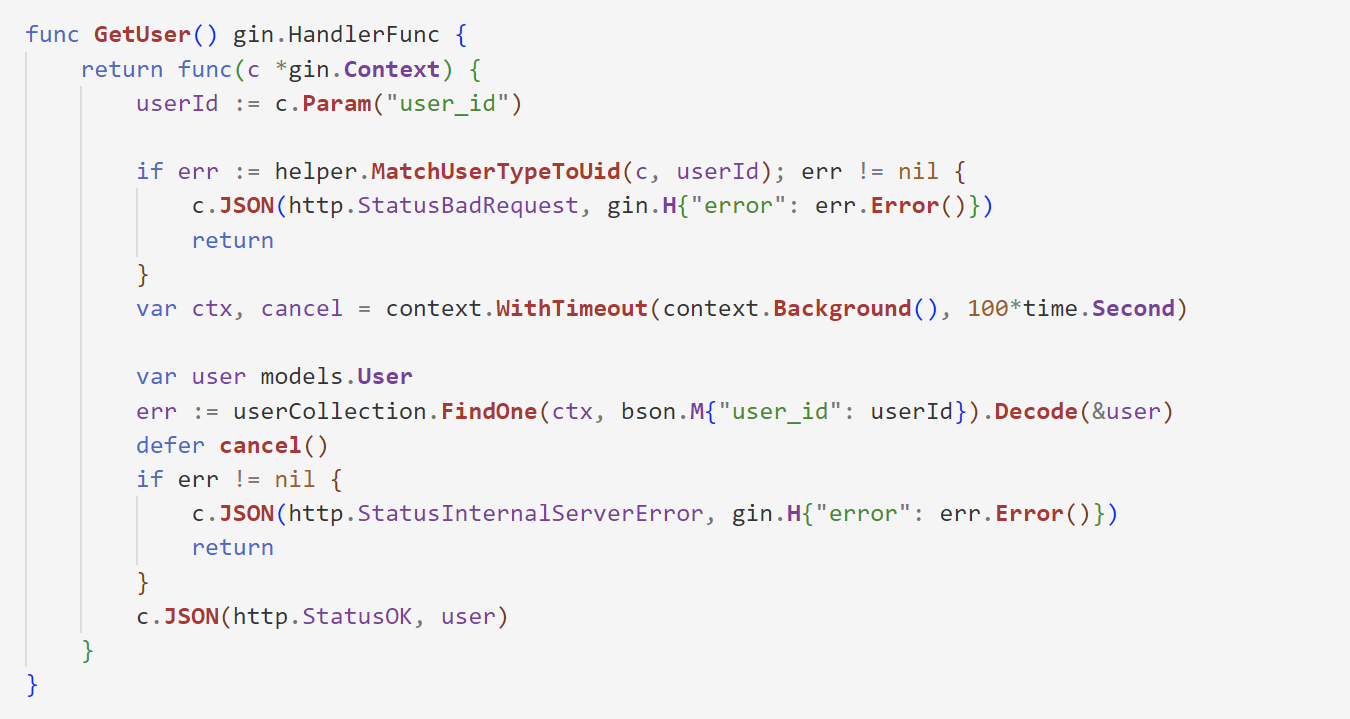
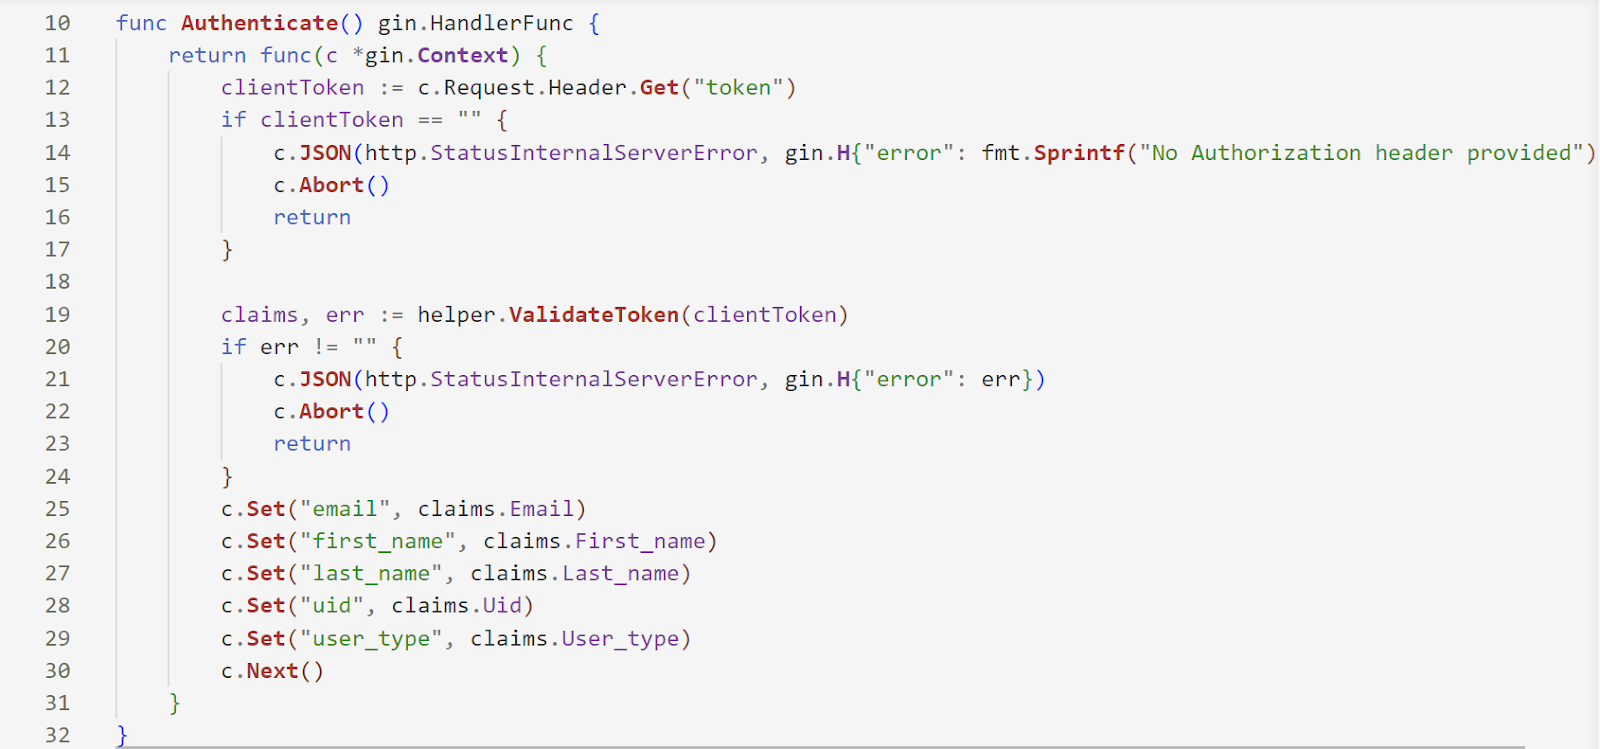
Next, I’ve built two files in routes: authRouter.go and userRouter.go. Whereas authRouter.go has a method that configures the routes for our application. It takes a gin.Engine instance and adds two routes to it: one for signup and one for login. In addition, userRouter.go declares a method that accepts an object of type *gin.Engine and returns null. It populates the incomingRoutes object with two new routes: /users and /users/:user id. The first route will use the controller package’s GetUsers() method, while the second will use the controller package’s GetUser() function. Next is the middleware folder which consists of the authMiddleware.go file in which Middleware includes an Authentication method that determines whether the request has a token in its header. (Refer to Image 3)


Following the above, I worked on controllers in which I specified the function, HashPassword, which accepts a string and returns a string. It uses bcrypt to hash the password. The hashed password is returned as a string by GenerateFromPassword(). Then I mentioned the VerifyPassword function, which validates the password. It requires two parameters: the providedPassword and the userPassword. The function returns both a boolean and a string. Before Proceeding Furthur, I would like to point that In Golang Web App Development you should have knowledge about four API’s i.e., POST, GET, PUT and DELETE since these are basics.Now, Let me make you understand the SignUp function, which creates a user. It collects the user’s information, verifies it, and puts it in the database. At the same time, I stated the Login function, which handles a user’s login using their ID and Password. Afterward, I worked on the remaining two methods in userControllers. GetUsers and GetUser are two go files. GetUsers is a function that lists all users in the database and returns them to the client, whereas GetUser is a function that lists users by ID and returns them to the client. (Please Refer to Images 4 & 5). There are two folders that are left, i.e., helpers and Database. So for database setup, I have already explained it in one of my blogs. You can have a look at it for reference.
Lastly, I will explain the authHelper.go and tokenHelper.go files which are present in the helpers folder in the main directory of the program. authHelper.go includes two functions in this case. CheckUserType, the first function, determines whether or not the user type fits the role. The MatchUserTypeToUid method determines if the user id matches the context uid. And tokenHelper.go has routines for generating, validating, and updating JWT tokens. In the authHelper.go file The imports are the packages that are needed to run this code. The first import, errors, is a package that allows us to create custom errors. The second import, github.com/gin-gonic/gin, is a package that allows us to use the gin framework for our web server. And, the packages remain the same for tokenHelper.go file. This is how you can make a JWT Authentication application in Golang using Gin Web Framework. Hope the tutorial was helpful to you.